Teaching guides
Understanding Cadmus Templates


Share with colleagues
Between teaching, supporting students, admin, and managing teaching teams, there isn’t much time left for reviewing your assessment designs. It’s even harder to make informed changes to assessments without doing the research into how to improve, or having the support and expertise of learning designers.
Templates are the perfect way to transform any old assessment into a task that puts student learning at its centre. They provide you with a base for assignment instructions and can easily be adapted to suit any task. Based on the latest learning theories and assessment design principles, Cadmus Templates put research into practice, ready for you to use. As a result, our templates consider ways to motivate students, cater to a range of skill levels, support the mastery of core academic skills, and encourage the organisation of learning processes (Ambrose et al., 2010).
Used effectively, templates can help you find opportunities to better support students, provide more feedback, and elevate your teaching practices.
Teachers have found the process of taking existing assessments and transferring them into templates incredibly eye-opening. It's an ideal opportunity to reflect on your assessment; considering what you want students to learn and whether it is being assessed appropriately.
Our templates follow a general structure which includes: Purpose, Task Description, Additional Information and a Checklist. Let's take a closer look at how templates are structured and how you can get the most out of them.
A sense of purpose
All our templates start with a 🎯 Purpose section. As student motivation directly impacts learning (Ambrose et al., 2010), it's important to help students understand the significance of each assessment task. Developing motivation in students encourages deeper engagement and consequently, deeper learning. As teachers, it's easy to see the value of an assessment beyond the point of final grades. However, students can lack longer-term vision when caught up in their day-to-day university studies.
Use the Purpose section for your best spiel in response to a student asking: "What's the point?" or "Why is this task important?"
Our templates come with a general Purpose statement to get you started, but you can make this more context-specific for your students. Where possible, we'd recommend addressing an assessment's purpose at three different levels:
1. Connect the task to the real world
Students love nothing more than knowing that what they are learning is actually applicable to life beyond university. Explain how students can use the specific skills or knowledge they gain in industry or their future careers.
2. Link the assessment to the course
Giving students context around where they are at, and where they are going can promote motivation. Connect your task to past and future subjects, to show students how an assessment is building upon their existing skills. This gives them a point of reference within their broader scope of learning, encouraging engagement and boosting confidence.
3. Call out connections to learning outcomes and activities
Your assessment should be well aligned with the learning outcomes for the subject and designed to assess these effectively (Biggs and Tang, 2011). By mentioning specific learning outcomes to students, you can frame up the way they think about the task and how it will be evaluated. Addressing how a task links to other learning activities (lectures, workshops, practical work, etc.) again contextualises learning and makes progression visible.

A well-outlined task
The next section in our Templates is for a ✏️ Task Description. This is where you'll include things such as the essay prompt, research topic or case description, as well as any other requirements for students. For example, students may need to access a minimum number of resources or consider specific theories in their analysis. The best way to communicate this information is through a list of requirements. Try to begin instructions with verbs (e.g. discuss, analyse, evaluate) that set expectations for students.
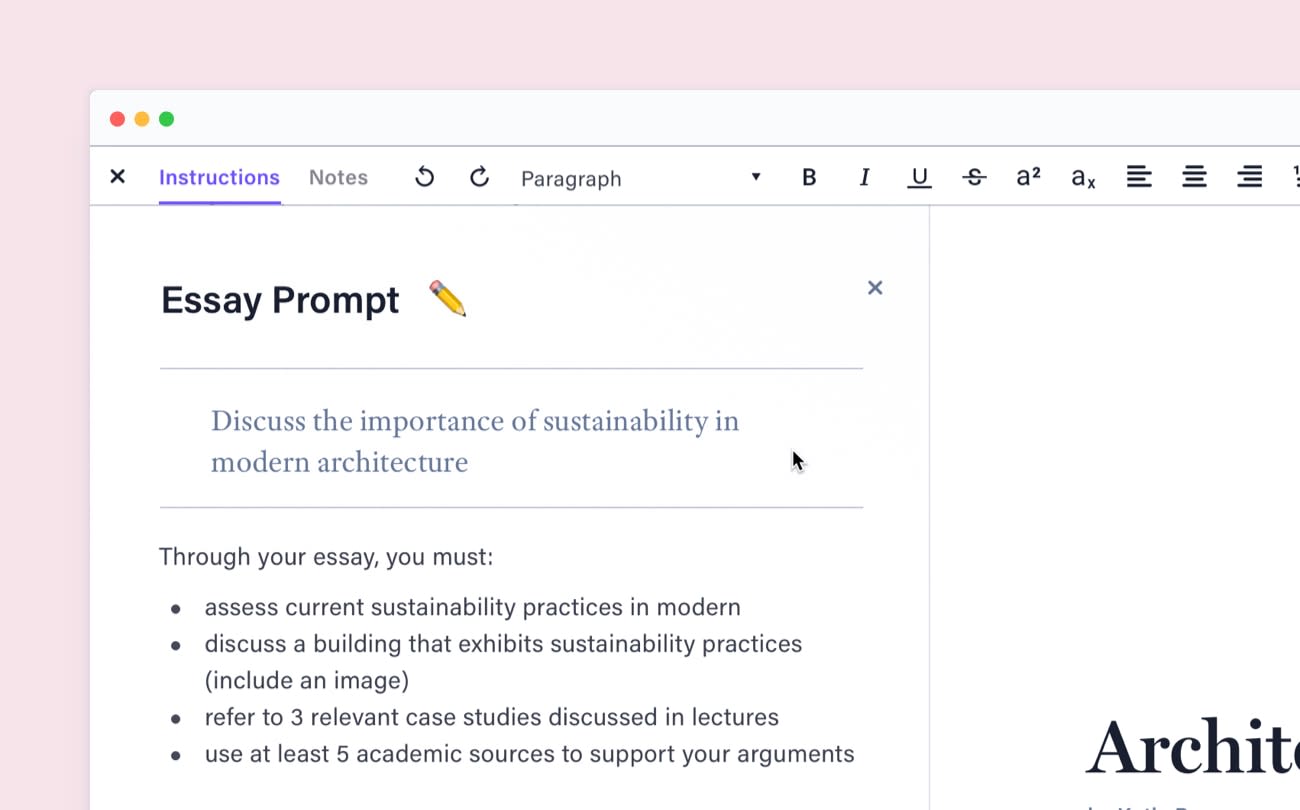
We'd recommend keeping content in this section high level, and unpacking instructions further through the ✅ Checklist (discussed further below) or an additional resource. This way, you can support students to develop skills appropriately, without making assumptions of prior knowledge. For example, consider what it means to "evaluate" or "reflect" in the context of your task, and prompt students with questions to draw out the appropriate thinking. You'll see examples of this in our checklists.
Support them with resources
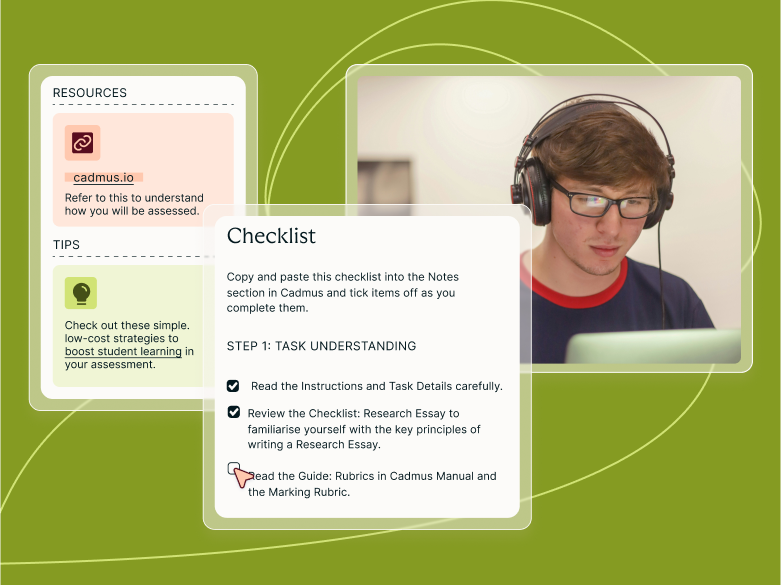
For most assessments, you'll find yourself wanting to share extra resources with students—things such as marking rubrics, library guides and useful website links. They're an ideal way to supplement varying levels of student knowledge, which can prevent proper engagement when not addressed. With Cadmus, you can easily attach files and links to your instructions in the Resources section.
All our templates also include an 📚 Additional Information section, where you can list out the resources supplementing the task and how they should be used. This helps students feel supported and confident that they have everything they need to complete a task successfully.
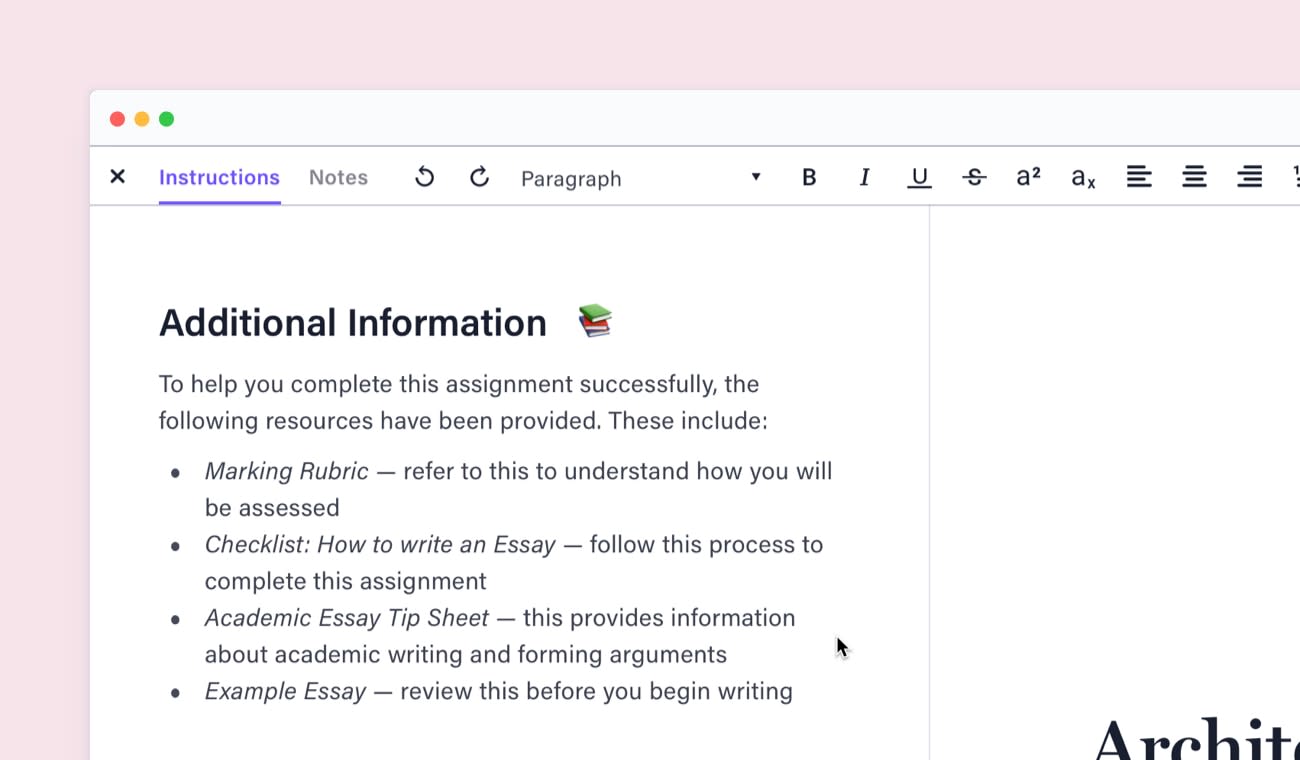
You'll notice our templates come pre-filled with some recommended resources:
Marking rubric
Including a rubric is a must for all assessments. They provide students with the ability to understand expectations and standards. This allows students to self-evaluate as they work, and understand feedback once it is returned.
A guide for understanding rubrics
Many students aren't quite sure how to interpret or use a rubric for their learning. Providing them with a guide that steps them through unpacking a rubric can be incredibly valuable. Check out this resource from University of Auckland.
Exemplar work
We recommend providing students with an exemplar to help formulate their understanding of quality work. Reviewing examples of work can be a valuable learning activity when paired with understanding the marking rubric, again developing a student's ability to evaluate their writing.
Library search tips
For assessments that involve research, it can be helpful to attach a guide on effective database searching. Most university libraries have guides published online, so this is the perfect opportunity to utilise these resources.
Remember: You can still add new resources after your assignment has been released. This means you can quickly respond to recurring questions or misunderstandings from students by providing a new resource or updating the instructions.
Our list of suggested resources is in no way comprehensive—it's there to get you thinking about the different ways you can supplement students' knowledge. The specifics of your task and experience with past cohorts will inform the need for other resources to include. As you curate more resources, consider the purpose of each and how you'd like students to engage with them.
Keep them on track
The way that students organise knowledge, and the processes they follow, impacts how they learn (Ambrose et al., 2010). With students of diverse backgrounds and varying degrees of experience, knowing how to approach a task effectively can sometimes be a challenge.
As we build students up towards becoming self-directed learners, we can provide scaffolds that lead them through the necessary actions for developing essential academic skills and completing assessments successfully.
All Cadmus Templates come with a scaffolded ✅ Checklist that guides students through completing a task—taking them through the stages of planning, research, writing and review. The checklists aim to create a positive learning experience for students as they work in Cadmus. Having clearly articulated steps to follow, or frameworks to guide thinking, gives students the confidence to keep working on an assessment. In particular, it allows them to break through initial feelings of confusion and start engaging sooner.
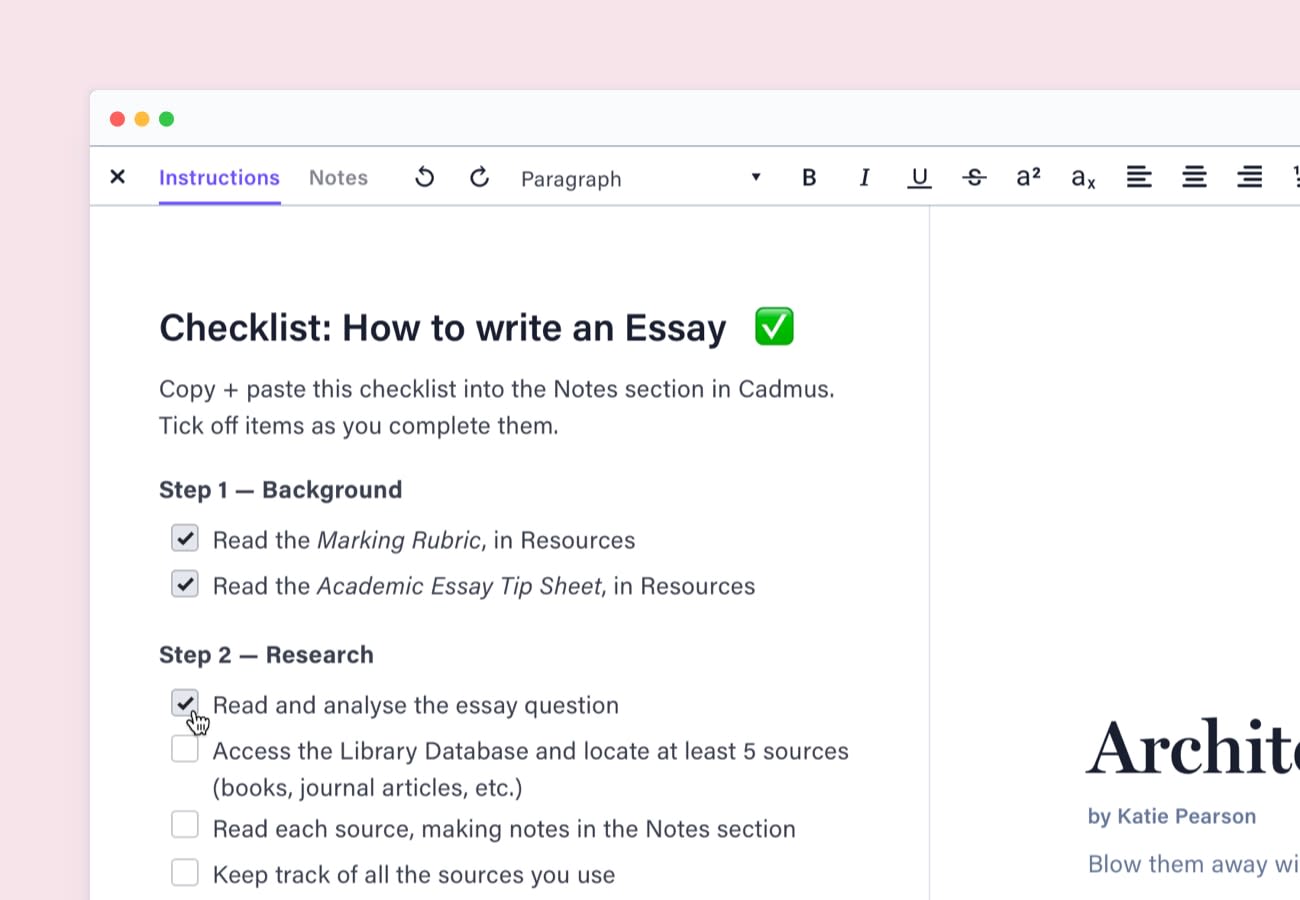
While our checklists are comprehensive in terms of creating an authentic learning journey for students to follow, there's still plenty of room for you to adapt and make these your own. They aim to connect a task to other learning activities and encourage more points of feedback. Ultimately though, no one knows your students better than you, so use the checklists to give as much or as little guidance as you see fit.
Here are a few ways you can make the most of checklists:
Break down steps, be specific
You'll notice that our checklists break down core skills into their component parts. These frameworks provide students with greater clarity around what is expected. For example, you'll see that "critical writing" comprises of "reporting on what you have read, interpreting the significance of ideas, etc...". In this way, we'd recommend breaking down any additional steps you add to the checklist into component tasks, depending on the skill level of your class.
Instead of:
- Critically review your selected resources.
Break down the skill for students...
Step 4: Critical reading
- As you read each resource, jot down notes using this framework:
- The author’s purpose: Why has the author written the material? Are these purposes explicitly stated? Are these implicitly stated?
- The author’s approach: What are the author’s underlying assumptions? Are these explicitly stated? Is there any proof of bias?
- Content: What is the author’s thesis? How do they develop the thesis? What evidence, examples, or explanations are used?
We often over-assume the level of understanding or experience students possess, creating instructions that lack the appropriate level of detail. This can cause students to feel confused and disengaged, quickly losing motivation. Giving students smaller steps to complete within a larger skill will support their learning and build confidence. As students are scaffolded through the assessment, they experience early success, promoting ongoing motivation.
Look for opportunities to add feedback
Seeing the stages of a student's learning process through the checklist gives you a clear overview of the actions they will be taking. As you review the process, consider points where formative feedback could be valuable. This doesn't have to be high cost either. You could ask students to:
- prepare a plan for feedback
- share their analysis of academic sources after the research phase
- provide feedback on a peer's work using the rubric
- assess their own work using the rubric
- submit a draft through Cadmus for review.
No matter how you decide to provide feedback, make sure to add the relevant steps into your checklist. This will ensure students stay on track and do the appropriate preparation for any in-class activities.
Step 5: Peer review
- Bring your draft (introduction and first argument) to class.
- Swap your work with a friend for review.
- Take notes against the rubric, highlighting opportunities for improvement.
Call out any resources you add
If you add any resources to the task, include a step in the checklist to indicate when students should engage with it. This links to the 📚 Additional Information section discussed earlier, which gives students context around how resources should be used and why they are valuable.
Tip: If you ask students to engage with particular resources at certain times, you can validate their engagement using Cadmus Insights.
Add dates next to checklist items
This is a great way to encourage early and consistent engagement with a task. It also teaches students how to manage their time effectively, setting good study habits that can be carried into future assessments.
By Friday 20 September (Week 8) you should have:
- edited the Methods section
- reviewed notes from the Statistical Analysis prac
- written your results.
With a clearer understanding of how to use Cadmus Templates effectively, you're ready to explore them for your own assessments. As you create instructions for your next assignment, take a moment to browse our full range of templates and choose one that best fits your needs.
Category
Hybrid Learning
Student Success